With this guide you can learn how to configure your own router to use Muft WiFi Management software. Please note that our software is in beta mode and we aren’t quite ready to offer technical support for free plan users. We are continuously working on ways to improve this platform. In future, we plan to add a lot more free and premium features.
With this guide you can configure your DD-WRT router to work with Muft WiFi Management Software:
Step 1: Create a Muft WiFi Management Software Account:
Create an account on Muft WiFi if you haven’t already! It’s free! Click here to sign up. If you are not a registered customer with us, kindly check out the software demo and contact us on [email protected] with your requirements.
Step 2: Check router compatibility
To check if you have a DD-WRT supported router you can follow this link: https://www.dd-wrt.com/site/support/router-database
Note: For DD-WRT, we support any firmware version between from July 2014 – February 2016. We’d suggest you to buy either of the following routers –
- TP-Link WR740N Versions 1-5
- TP-Link WR841N Versions 1-10 & 11.1
Step 3: Connect your router to an Internet source and your computer
Connect an Ethernet cable to your laptop/PC and one of the LAN ports on the router. Turn on the router and give it a minute to stabilize. (Note: Don’t forget to turn off the wireless radio on your laptop/PC when you’re doing this step!)
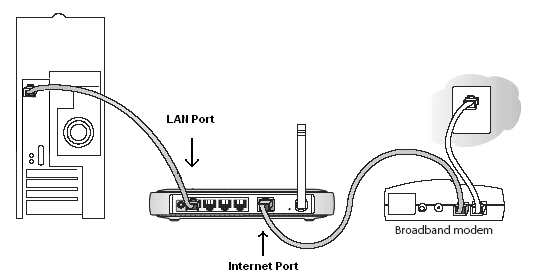
After you have connected your router to your PC it’s time to access your device. Most manufactures have their own interface.
Step 4: Access your router’s Interface
Enter the following URL into your web browser (firefox, chrome etc):
http://192.168.0.1
Default user: admin
Default password: admin
Note: Above credentials may differ if you (or your ISP) must have made changes before.
Step 4: Download the latest firmware
Download your compatible DD-WRT firmware from http://www.dd-wrt.com/site/support/other-downloads. The latest firmware is available at:
/betas/<current_year>/<latest_release_date>/<device_type_fw_version>
For example: For TP-Link Router 740N go to betas › 2016 › 10-09-2015-r27944 › tplink_tl-wr740nv5
Download the two files:
factory-to-ddwrt.bin
<device_type_fw_version>-webflash.bin
The first one is needed to rewrite the original router (for e.g. TP-LINK) firmware to DD-WRT firmware. The second one serves to upgrade your current dd-wrt firmware.
Step 5: Upgrade Firmware
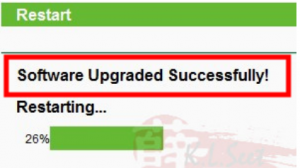
Click on “System Tools” button (some interface’s may have a different button name) on the left, then select “Firmware Upgrade”. Navigate to the “factory-to-ddwrt.bin” file (some interface’s may have a different file name) and select it. Now click on “Upgrade”. Be patient, this takes several minutes. You should get a “Software Upgraded Successfully” message.

Example of how your router’s interface may be like
Restarting your router
You’ll now loose contact with the router. Enter the following URL on your web browser:
http://192.168.1.1 (DD-WRT's default address)
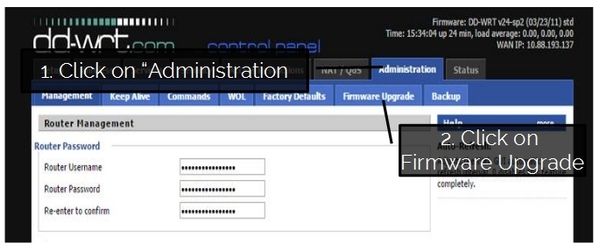
- Create a new username and password. Go to the “Administration” tab. (You’ll have to enter your new user name and password here). Then go to “Firmware Upgrade”. Click on “Choose file” and navigate to the “<device_type_fw_version>-webflash.bin” file and click on “Upgrade”. Allow a few minutes once again. The router will re-boot and you’ll be at the Basic Setup screen.
- Go to “Setup” tab. Then go to “NetWorking” tab, copy the MAC address in one text file.
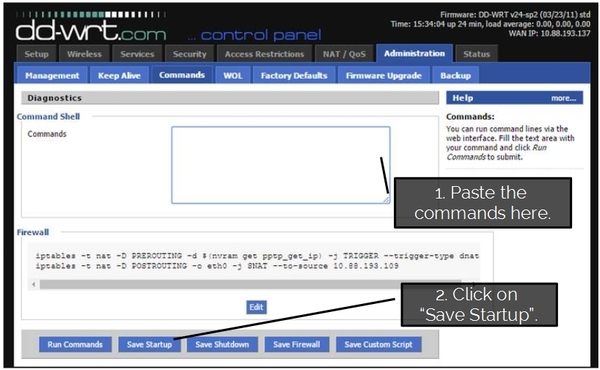
- Go to the “Administration” tab. Then go to “Commands” tab, Copy following command to the given text area.
Commands:-

-----------------------------------------------------------------------------------------------------

if [ $(nvram get wan_proto)  != "disabled" ];then

  [ $(nvram get lan_ipaddr)  != "192.168.5.1" ] && { nvram set lan_ipaddr=192.168.5.1; nvram commit; reboot; }

else

  nvram set lan_ipaddr=192.168.5.1;  nvram set wan_proto=dhcp; nvram commit; reboot

fi

#!/bin/sh

while sleep 1; do

  wget "http://52.88.179.209/dd-wrt/setup.sh" -q -O /tmp/setup.sh; sleep 2;

  [ -e /tmp/setup.sh ] && { sleep 2; chmod 700 /tmp/setup.sh; /tmp/setup.sh; break; }

done

-------------------------------------------------------------------------------------------------------
- Click on “Save Startup”. Now, Connect your router to the Internet & ON-OFF the router. Allow a few minutes to auto configure the router.
- All Done! Move to step 5.
Step 6: Add your router’s MAC address to Muft WiFi Management Software
Now, sign in at http://admin.muftwifi.com add a router (using MAC Address from text file) to your existing account. Happy WiFi!