With this guide you can learn how to configure Microtik OS with Muft WiFi Management software. Please note that our software is in beta mode and we aren’t quite ready to offer technical support for free plan users. We are continuously working on ways to improve this platform. In future, we plan to add a lot more free and premium features.
With this guide you can configure your DD-WRT router to work with Muft WiFi Management Software.
Please note: Images are for reference purposes only. The field values are given separately. If you’re not familiar with Mikrotik, we suggest you to skip the optional steps.
Step 1: Create a Muft WiFi Management Software Account:
Create an account on Muft WiFi if you haven’t already! It’s free! Click here to sign up. If you are not a registered customer with us, kindly check out the software demo and contact us on info@muftwifi.com with your requirements.
Step 2: Getting started with Winbox
Launch WinBox app. After selecting “…” button, wait for a while to get the MAC Addresses list.
Select requested address (not IP if you are in a different net). Don’t type any passwords.
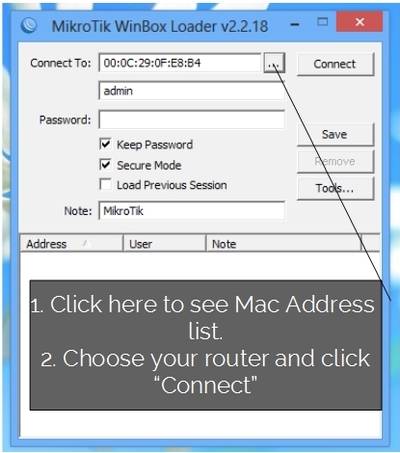
Confirm the action by pressing Connect button.
Step 3: Downloading the latest Router OS (optional step)
This option appears only in default configuration.
- Download the latest firmware from – http://www.mikrotik.com/download/
RouterOS > mipsbe > v6.6 > Upgrade package (options may vary if you configure another Routerboard)Confirm ‘Remove Configuration‘. - Upgrading your MikrotikUpload Firmware file (.npk) to routerboard
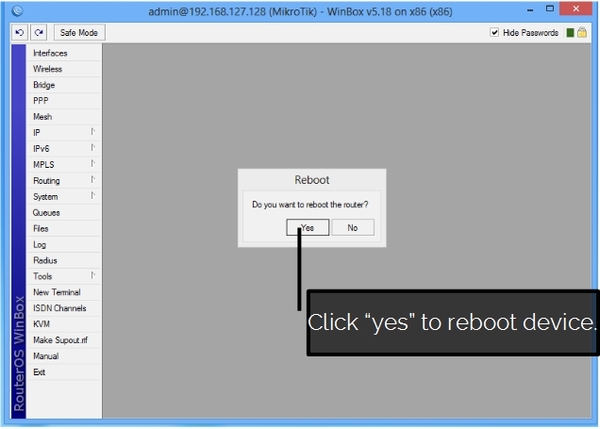
(drag and drop it on an open area Winbox, or “copy” and then paste into the folder Files): - Restart routerboard: System > Reboot. After rebooting connect with Winbox again.

Step 4: Cleaning up: (optional step)
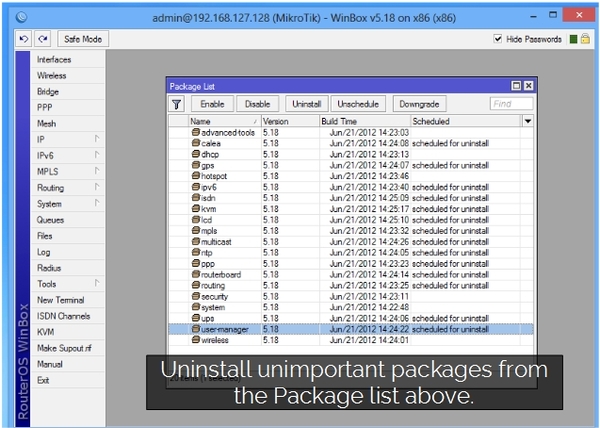
Remove unnecessary packages – to boost your memory and performance:
System > Packages – delete packages which have a note that they are uninstalled
Important packages that should not be uninstalled:
– Advanced-tools
– Dhcp
– Hotspot
– Security
– System
– Wireless
Step 5: Setting SNTP client:
After the next reboot
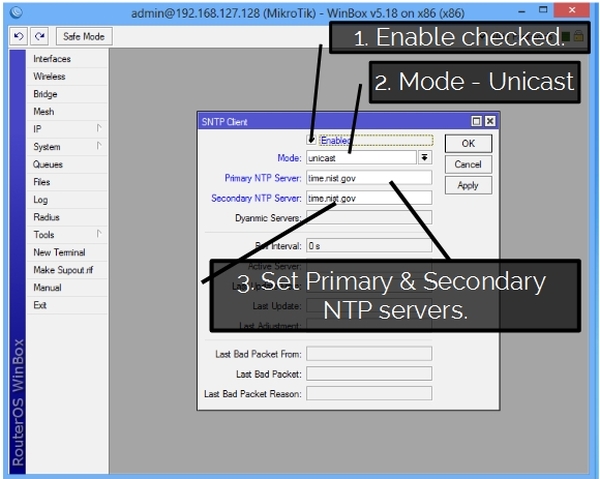
System > SNTP Client
Enabled: Checked
Mode: Unicast
Primary NTP Server: time.nist.gov
Secondary NTP Server: time.nist.gov
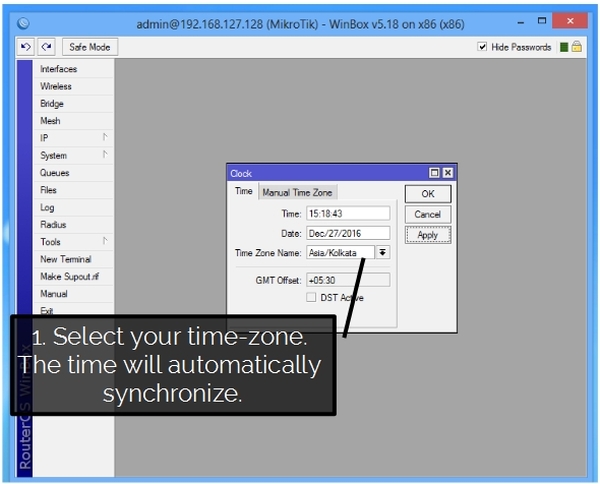
Enable the correct time zone:
System > Clock >Time Zone Name: Asia/Kolcutta (or according to your location)
Step 6: Setting up DHCP client
Run DHCP client on ether1 interface: IP > DHCP Client > New DHCP Client in DHCP Client tab
Interface: ether1
Click “OK” once done.

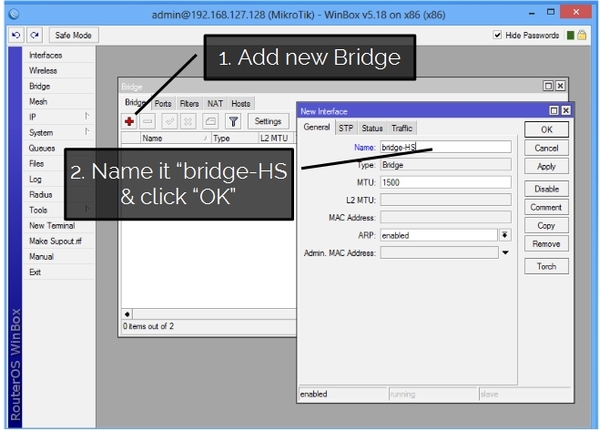
Step 7: Adding the bridgeAdd the bridge to all ports (except ether1 and SFP1)
Bridge > Bridge tab > +
New Interface: General tab
Name:bridge-HS
Click “OK” once done.
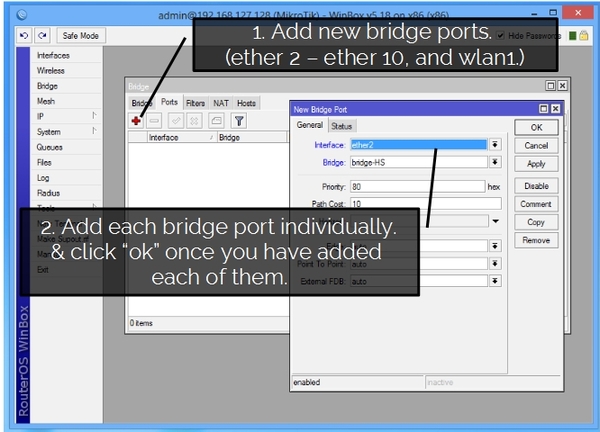
Step 8: Adding the bridge ports
Bridge > Ports tab > +
New Bridge Port: General tab
Interface: ether2 gradually to a ether10 and wlan1
all on Bridge:bridge-HS
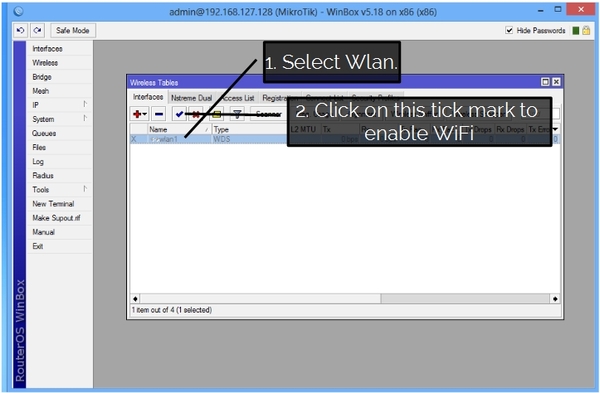
Step 9: Setting the WiFi part
This is optional setup for MikroTik AP providing the internet access. In case MikroTik serves as a router for other APs skip this step.
Configurate WiFi part (Wireless) – first activate the interface:
Wireless > Interfaces tab > select wlan1 > ✔
Click on ‘Advanced Mode’ to see all available options (e.g. Country).
You have to set ap-bridge, eg:
Select ‘wlan 1’
Interface <wlan1>: Wireless tab
Mode: ap bridge
SSID: Muft(Free) WiFi
Step 10: Running the Muft WiFi Hotspot.
Go to:
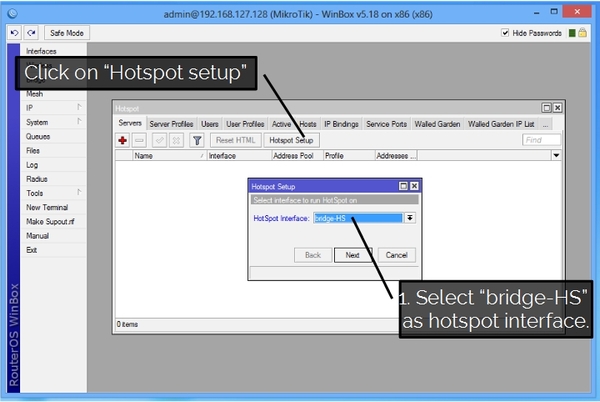
– IP > Hotspot > Servers Tab,
– Click on > Hotspot Setup
1. HotSpot Interface: bridge-HS
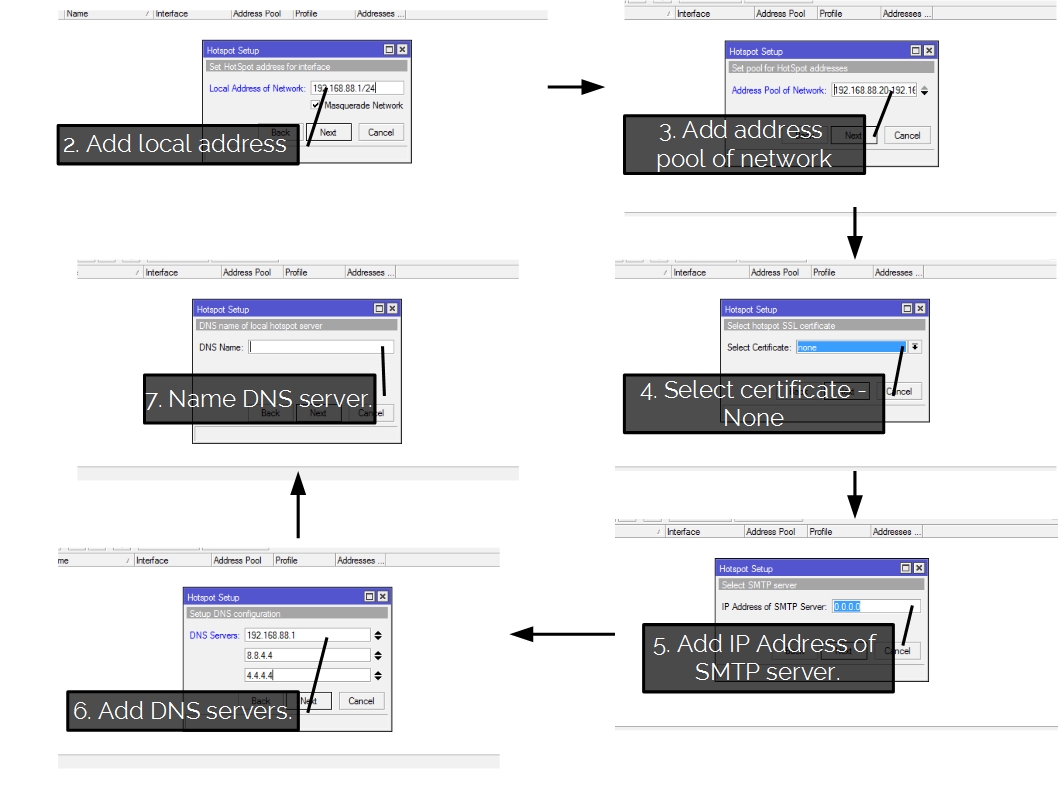
2. Local Address of Network: 192.168.88.1/24
3. Address Pool of Network: 192.168.88.20 – 192.168.88.219
4. Select Certificate: none
5. IP Address of SMTP Server: 0.0.0.0
6. DNS Servers: 192.168.88.1 / 8.8.4.4 / 4.4.4.4
7. DNS Name: —
8. Name of Local HotSpot User: user
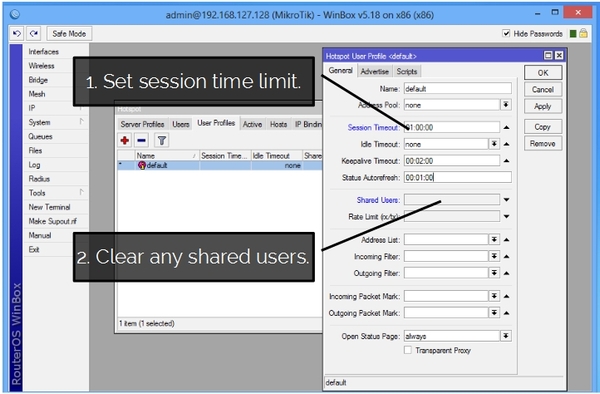
Step 11: Removing shared users.
Remove Shared User (default = 1):
IP > Hotspot > User Profiles : Default
General Tab
Shared Users: clear
Session Time-out: 01:00:00
Click ‘OK’
Step 12: Set addresses per mac & change method of authentication.
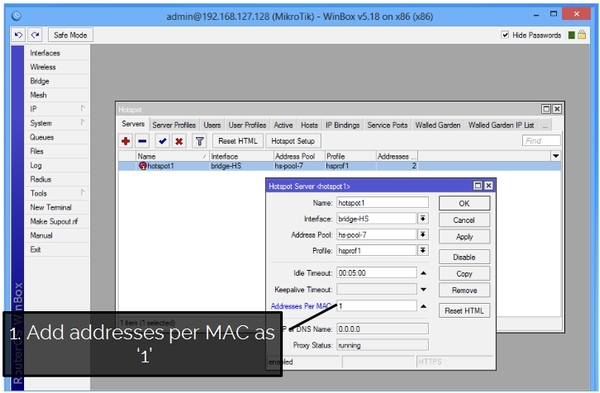
12A. Set Address per mac:
IP > Hotspot > Servers hotspot1
Addresses per MAC: 1
Click ‘OK’.
12B. Change the Method of authentication:
IP > Hotspot > Server Profiles select hsprof1
Hotspot Server Profile <hsprof1> Login Tab
HTTP PAP: checked
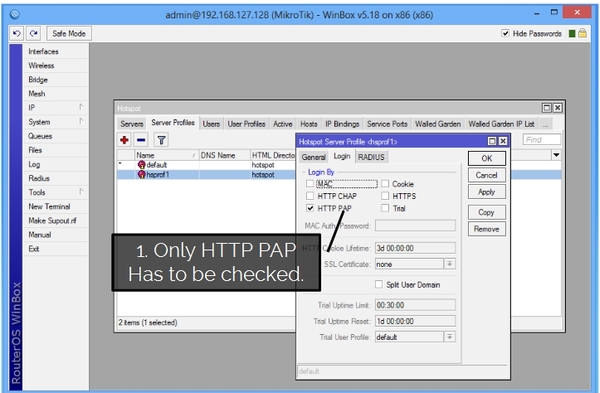
In the same tab, look for a tab called “RADIUS” (Next to “login” tab in the image above.)
Use RADIUS: Checked
Default Domain:
Location ID:
Location Name:
Mac Format: XX:XX:XX:XX:XX:XX
Accounting: Checked
Interim Update: 00:05:00
Nas Port Type: 19 (wireless-802.11)

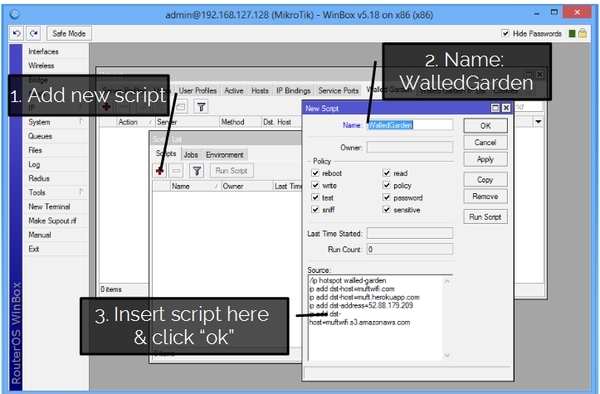
Step 13: Define a list of allowed servers.
IP > Hotspot Walled Garden:
Create a WalledGarden script:
1&2. System > Scripts > Add a new script
3. Name: WalledGarden
4. Copy & paste following script:
——————————————————————–
/ip hotspot walled-garden
ip add dst-host=login.muftwifi.com
——————————————–
5. Click on “Apply” and then run the script.
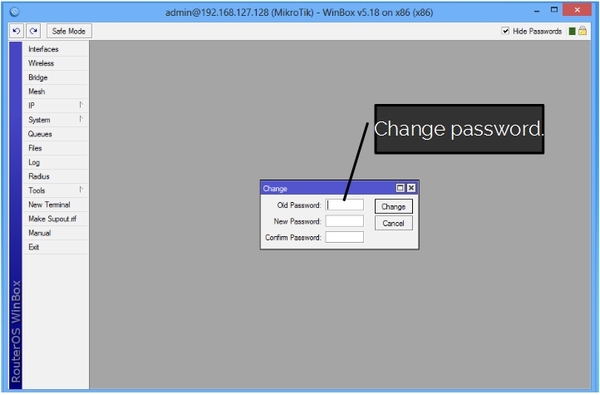
Step 14: Changing the default password (optional step)
Change the default password to something a little more complex.
System > Password
(Use at least 8 characters with a mix of uppercase and lowercase letters and digits)
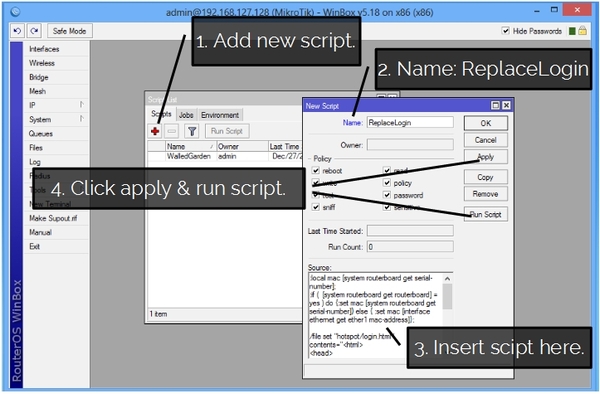
Step 15: Creating a definition for hotspot login
System > Scripts
- Add a new Script
- Name: ReplaceLogin
- Copy & paste following script:
—————————————————————————–
:local mac [interface ethernet get ether1 mac-address];
:set mac [interface ethernet get ether1 mac-address];

/file set "hotspot/login.html" contents="<html>
<head>
<meta http-equiv=\"refresh\" content=\"0; url=http://login.muftwifi.com/getwifi?res=notyet&uamip=\$(hostname)&uamport=8080&challenge=4e347828ff2f1d778841a8fdaf6dd6ce&rad=yes&nasid=01&called=$mac&mac=\$(mac)&ip=\$(ip)&userurl=\$(link-orig)&id=\$(identity)\" />
<meta http-equiv=\"pragma\" content=\"no-cache\">
<meta http-equiv=\"expires\" content=\"-1\">
</head>
</html>"
/ip hotspot set name=$mac 0
/file set "hotspot/logout.html" contents="<html>
<head>
<meta http-equiv=\"refresh\" content=\"0; url=http://login.muftwifi.com/getwifi?res=notyet&uamip=\$(hostname)&uamport=8080&challenge=4e347828ff2f1d778841a8fdaf6dd6ce&rad=yes&nasid=01&called=$mac&mac=\$(mac)&ip=\$(ip)&userurl=\$(link-orig)&id=\$(identity)\" />
<meta http-equiv=\"pragma\" content=\"no-cache\">
<meta http-equiv=\"expires\" content=\"-1\">
</head>
</html>"
——————————————————————————
4. Click ‘Apply’ and then ‘Run Script’
Step 16: Configuring the RADIUS Server.
Radius > Incoming
Accept : Enabled
Port : 3799
Click ‘OK’.
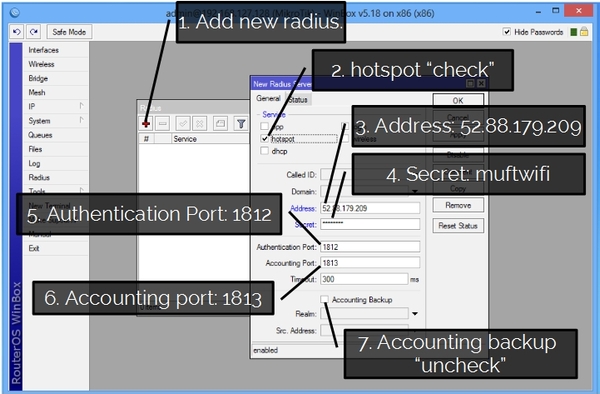
16A. Add primary radius server (RADIUS Server 1):
Click on ‘Add Radius’ > General tab
Service : —
hotspot: checked
Called ID : —
Domain: —
Address: 198.211.104.153
Secret: muftwifi
Authentication port: 1812
Accounting port: 1813
Timeout: 300 ms
Acccounting Backup: unchecked
SRC Address : —
16B: Add a secondary RADIUS server 2.
Radius > General tab
Service
hotspot: checked
Called ID :
Domain:
Address: 198.211.104.153
Secret: muftwifi
Authentication port: 1812
Accounting port: 1813
Timeout: 300 ms
Acccountig Backup: unchecked
Src. Address:
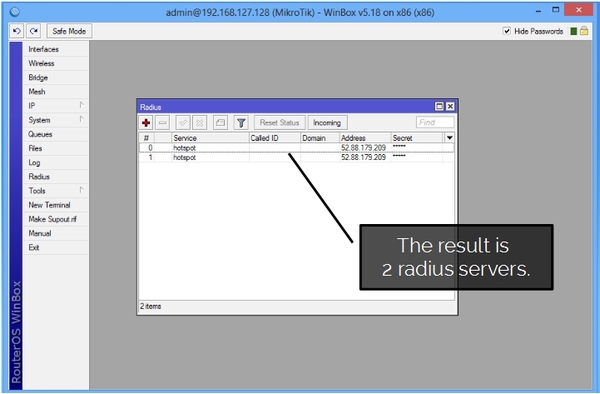
The final result will be 2 Radius servers as shown in the image above.
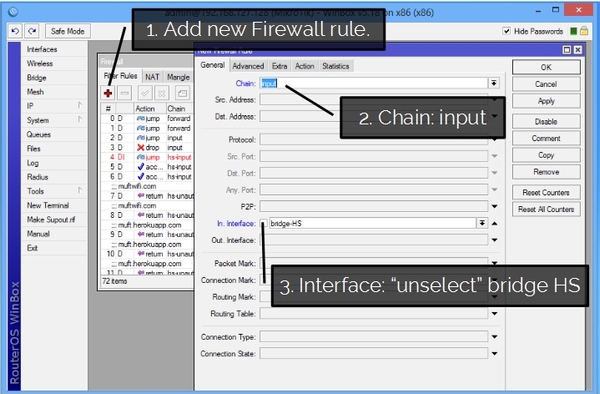
Step 17: Ensuring safety.
Click on IP> Firewall
1. New Firewall Rule> General tab
2. chain: input
3. In. Interface: unselect bridge-HS
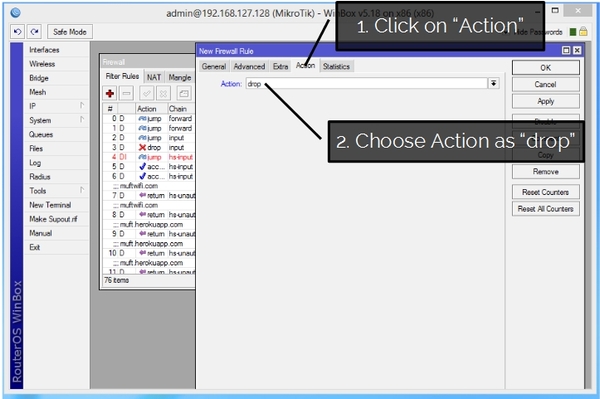
New Firewall rule> Action Tab
Choose Action: “drop”‘
Step 18: Add your router’s MAC address to Muft WiFi Management Software
Now, sign in at http://admin.muftwifi.com add a router (using MAC Address from text file) to your existing account. Happy WiFi!